On the border of North-east India and Bangladesh live the indigenous War-Khasi people. These people are famous for their millennia-old practice of creating living root bridges. A fig tree (Ficus elastic) with aerial roots is used to form the natural structures. Tied, twisted, and woven together, roots are guided over rivers and streams and anchor themselves to rocks, connecting villages throughout the region. Many of these living plant bridges last hundreds of years, constantly growing while structurally maintained by the War-Khasi people. These amazing bridges not only demonstrate the wonders of nature (check it out) but the value inherent in plant training techniques.

Plant training encompasses a vast array of approaches, ranging from simple plant staking to advanced Bonsai pruning and care. Below we outline the benefits of various plant training techniques, the tools you may need, and several Low-Stress Training and High-Stress Training techniques you can put to use immediately!
What is Plant Training?
Plant training, simply put, is physically manipulating a plant to get desired results. That’s a pretty broad definition, so let’s break it down. Physical manipulation is any hands-on activity where we are physically changing the plant. Getting desired results is vague and broad but this is because your goal varies depending on what you’re growing and what want from your plants. For example, are you training for bigger harvests or are you trying to avoid specific diseases or just to have plants grow a certain way for the aesthetics? In general, we are looking to improve (rather than, ya know, kill) our crops and you don’t have to use just one technique. Centuries-old vineyards, where grape vines have been woven through fencing, is a prime example. This plant training encourages grapes to grow instead of leaves, opens up the plants to prevent fungal disease and makes harvesting easier, all great goals to strive for.
How Does it Work?
A fundamental tenant of plant training is the application of stress to your plants. While almost all plant training is built off of this principle, it should be noted that reactions vary, meaning the result of any particular type of stress can differ from one plant to another. When we talk about stressing a plant, we’re not giving it past-due water bills or having its mother-in-law visit, instead, we are triggering natural responses that plants have to the stressors of nature such as weather, disease, insects, competing plants, and animals. Stressors like, heat, frosts, plants being eaten, fungus taking over, and all can drastically change the outcome of plant growth. We will show you several controlled plant-stressing methods to boost your yields and grow your gardening prowess, but first, let’s take a closer look at what you’ll get out of it.
Benefits of Plant Training
You may be asking yourself, why should I take the time to tie up and stress my plants? Besides the pleasure of spending a little extra time with your plants, there are several immediate benefits to some simple training. Plant training can help to expedite your harvest, maximize your gardening space, improve airflow around plants, boost light penetration, protect plants against disease, and most importantly boost your yields.
Expeditious Harvelicous – An organized garden is a happy garden. Through plant training, fruits and flowers will be much easier to pick and harvest. Most gardeners inherently do this, planting neat rows of crops, staking tomatoes, and organizing our tents almost feels like second nature. Plant training provides the additional benefit of minimizing unnecessary growth, which gives you easy access and quick pickings for all your crops.
Space to the Max – Filling an entire grow tent with plants can be tough. The plant that wins the canopy race tends to dominate, while the rest of your grow room kingdom is stuck with less light. Through various plant training techniques, plants can be bent, pruned, and shaped into efficient forms that allow all plants in the space to get enough light. By actively training plants with the proper methods, you can more than double the plant biomass of the grow space.
Inflow Airflow – Airflow is an often overlooked element of indoor gardens. Not only does proper airflow ensure plants receive healthy amounts of CO2 but also prevents fungal infections like powdery mildew from taking hold. By pruning and bending you can improve air circulation to all portions of your plants, keeping CO2 levels refreshed and moisture levels low enough to prevent fungi from growing.
Light Penetration 3000 – Essential to photosynthesis, powerful horticultural light hitting all of a plant’s leaves is key for growing success. In indoor gardens our grow lights are not nearly as powerful as the Sun, so we need to train our plants in order to achieve as much canopy penetration as possible. Through methods such as pruning and SCROG, we redistribute canopy leaves to provide a pathway for light to reach low branches and leaves.
Disease Defense – Disease or pests wiping out a garden can be one of the most heartbreaking happenings for any gardener. Through plant training, you can take preventive steps to proactively protect against pestilence. Removing dead or dying growth, identifying pests before they become a problem, and keeping up good airflow all help to keep your plants in good health.
Big League Yields – The meat and potatoes, or more aptly the beans and tomatoes of plant training is generating larger harvests. All of the techniques you’ll read about below are in some way designed to increase the total size and weight of your crops. By and large, plant training will create additional fruiting and flowering sites, focus resources on those fruiting and flowering sites, and stress a plant to induce hormone production and growth. Read on for Low-Stress and High-Stress Training techniques to learn how to capture this cavalcade of benefits for your own grow.
Low Stress Training Techniques (LST)
Bending
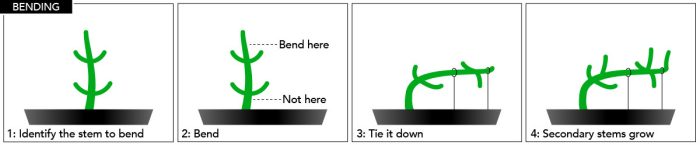
Bending is the backbone of LST. Performed by maneuvering branches into a favorable or desired position, bending is simple to do, has a very low risk of shocking plants, and can be performed on virtually any species. For this technique, all that’s needed is material to tie down your plants such as string, twist ties, or foam coated plant ties. To begin, select the stem that you wish to bend. At first, this will be the main shoot of your plant but as time goes on you’ll likely be bending many branches at once. To bend the stem/branch gently grip near the top of the shoot and carefully curve the shoot down until it is at or near horizontal (at a 90-degree angle) or until further bending would damage the plant. Finally, use foam ties to secure the shoot to the edge of your growing container or any other good anchor. Bending redirects growth hormones from the tip of the main stem, scientifically known as the apical meristem, to the rest of the braches. Essentially, this method tricks the plant into pushing its secondary shoots to grow faster. A great way to break into plant training, bending is the most accessible of all training techniques.
Trellis Netting
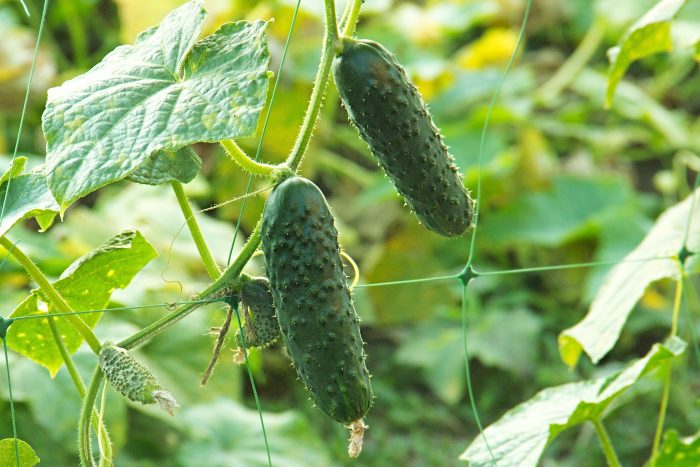
Trellis Netting is not an LST in and of itself but is an extremely important tool used in a variety of LST techniques. Made of up rigid, non-porous plastic for outdoor applications or soft nylon for indoor cultivation, trellis netting looks like a mini cargo net, usually made up of 6” or 3.5” squares. Trellis netting can offer vertical and horizontal support for plants. For example, many gardeners will vertically hang trellis netting on an outdoor wall or inside a grow tent, giving climbing plants like peas, tomatoes, and cucumbers something to grip. Trellis netting is also useful to cut back on garden costs, instead of a tomato cage for every single plant, a few well-placed sections of trellis netting will perform just as well in supporting plants’ weight.
SCROG

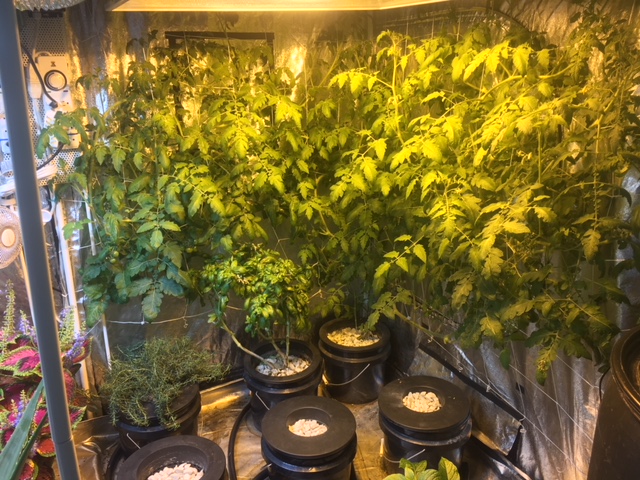
Screen of Green, better known as SCROG or Scrogging, is a canopy development technique that utilizes horizontally positioned trellis netting in conjunction with bending. The goal of this method is to create a lush, even canopy by weaving plant growth through the trellis squares, resulting in a massive boost to the amount of light your plant receives as well as a boost to fruiting or flowering sites that would have otherwise receive little light. For this technique, you’ll need trellis netting or a wide screen. First, hang your netting horizontally above the canopy of your garden, this can be performed well in advance or immediately before starting the SCROG depending on how easy it is to work around your plants. Next, let your plants grow up and through the screen. As individual branches grow up through the netting, bend those stems and weave them through the trellis netting. Branches are bent away from the center of the plant, outward on a slight curve until all the squares are filled. This will be an ongoing process, but the end goal is to weave as many branches through the netting as possible to expose all fruiting or flowering sites to direct light. Scrogging provides a twofold advantage, it supports the weight of the fruits or flowers on your plant and develops even canopy growth for better use of indoor light. In addition, SCROG works wonders if you’re growing a small number of plants and want to maximize your harvest.
Staking
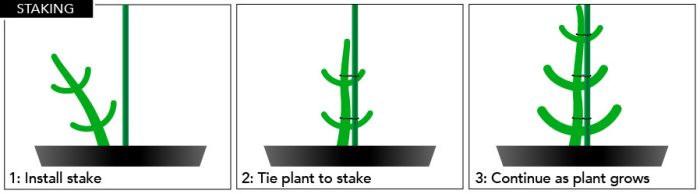
Staking utilizes plant stakes, also commonly referred to as tomato stakes, to support the main stem of a plant. These can come in a variety of materials but are commonly available in sustainable, natural bamboo and hollow steel poles with a weatherproof plastic coating. Steel stakes will provide a more rigid support should you need something slightly less flexible. Typically found in lengths of 2’, 3’, 4’, 6’, and 8’ stakes are widely available and a straightforward way to reinforce a plant’s stem. For this technique, you’ll need plant stakes and soft foam ties, plant clips, or string. First, push your stake downward in the growing medium next to your plant. Then, as your plant grows, secure the main stem to the stake using whichever tie you prefer. They can be utilized in a variety of growing contexts, even in some hydro media situations, and overall are one of the most simple, and cost-effective solutions to a plant in need of extra support.
High Stress Training (HST)
Pruning
The foundation of most HST techniques, Pruning is the discerning removal of buds, branches, foliage, and roots to shape plants, improve their health, and boost harvest yields. For this technique, you’ll need a pair of pruning scissors or a precision blade and rubbing alcohol. Pruning is a stressful process for plants so be sure to always work in moderation when doing any type of trimming. Ensure that you’re using sharp, clean scissors to make all cuts and adjustments to your plants. Fresh cuts on plants are especially susceptible to disease, fungi, and pests, a preventative step to take is cleaning your scissors or blades with rubbing alcohol before, during, and after pruning their plants. This is epically important when using scissors that have been used to trim plants outdoors. Scissors that have been used outdoors may have encountered fungal spores or hitchhiking pests so be sure to thoroughly clean your tools before use.
Pruning comes with some best practices guidelines that will help ensure maximum plant growth. First, always use clean instruments. Secondly, avoid pruning until your plant has had adequate time to develop – you need to leave enough leaves and stem for the plant to continue to grow rapidly. In general, only start pruning after the plant has several nodes and healthy leaves. Third, give your plant a break in-between prunes, too much pruning on too many consecutive days, especially during the vegetative phase, can seriously hinder a plant’s growth. Give your plant around 2 to 5 days to recover after pruning, the more you prune, the more time you should leave your plant. Finally, aim to prune away underperforming branches, wasteful branches, and leaves with little potential yield. This varies greatly from plant to plant, but traits of branches to prune are: low on the main stem, thinness or lankiness, large internode spacing, smaller leaves, little access to light, few to no flowering sites, little to no potential for canopy leaves, and any disease or rot. Keeping these practices in mind will build good, lifelong pruning habits to get the best out of any plant.
Defoliation
Defoliation is an advanced HST technique used throughout vegetative growth and into the early part of plant flowering. Our goal is to direct as much growth as possible to flowering and fruiting sites by eliminating some of a plant’s foliage. General defoliation during veg can happen at any point after the first two weeks, this will mostly be taking away underperforming or obstructive leaves. For this technique, you’ll need pruning scissors or a precision blade and rubbing alcohol. To defoliate during bloom trim away as many leaves as you’re comfortable with. The goal is to eliminate most leaves outside of your fruiting and flowering sites. After that, let your plant bloom for two to three weeks. It’ll need time to recover after a through defoliating. The second round of defoliation in bloom should happen 17 to 21 days after the initial pruning. Defoliation will significantly boost airflow to flowering sites, refocus plant energy on fruits and flowers, and allow for much better light canopy penetration.
Lollipopping
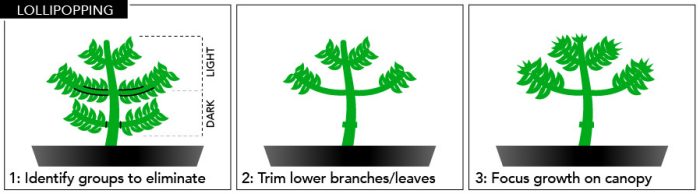
Lollipopping takes its name from the lollipop-like appearance plants have after being lollipopped. This HST technique is used during the vegetative phase of plant growth, immediately before your plants begin to bloom. The goal of this technique is to eliminate all of the secondary stems and leaves below the canopy to focus growth on flowering sites within the canopy. For this technique, you’ll need pruning scissors or a precision blade and rubbing alcohol. First, identify the growth beneath the canopy that is receiving little light. This is going to be the targeting of our pruning. Next, cut away branches that are low on the plant or are not a component of the canopy. You should be taking out about 30-40% of the plant beneath the canopy. Finally, give your plant a few days to recover before starting a bloom light cycle. Once growth restarts after the pruning, you’re good to go. Lollipopping is best used on plants that build a strong canopy, like peppers and okra. This technique will maximize airflow around your plants as well as boost flowering and fruiting.
Topping
One of the simplest HST techniques, topping is an easy and effective method for boosting yields and developing a canopy during vegetative growth. By cutting away growth at the apical meristem, the tip of the main stem, we cause the plant to develop new side shoots in place of one main shoot. For this technique, you’ll need pruning scissors or a precision blade and rubbing alcohol. First, identify the apical meristem of your plant. This is just the main large stem where new growth comes from. Next, to remove this new growth, make a cut just above the highest node on your plant. Take a look at the diagram below for more detail as to where you should be cutting. After a few days, you should be able to see new growth appearing around the node you just snipped. Topping yields a double effect on a plant, it splits the main stem into two and eliminates the apical meristem. The removal of the primary growing tip of a plant redirects growth to secondary stems and ancillary fruiting sites. Topping is an easy and effective way for any gardener to try their hand at HST.
FIM
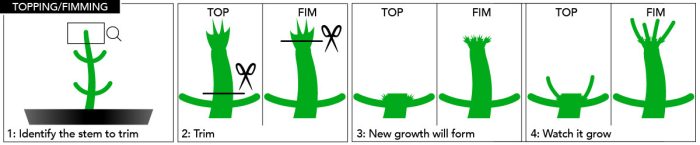
An abbreviation for “(insert common exclamation of displeasure and/or astonishment) I Missed”, FIM or Fimming is a variant of the Topping method previously described. In place of removing the entire meristem, you should aim to cut away 30-40% of just the tip of the plant. By leaving a small portion of growth behind, it’s possible for your plant to produce multiple new shoots from the cut area, not just two like when topping. For this technique, you’ll need pruning scissors or a precision blade and rubbing alcohol. First, identify the apical meristem of your plant, like with topping above. Next, make a cut right through the center of the dense plant tissue at the apex of the main stem. Check out the diagram below for more detail as to where you should be cutting. After a few days, you should be able to see new growth emerging from the area that you’ve just cut. FIM, just like Topping, has the dual benefit of creating more shoots and redirecting growth to secondary stems.
Stem Mutilation
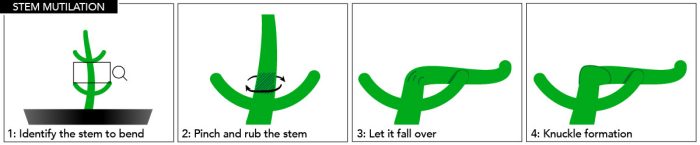
Stem Mutilation, also known as super-cropping, is an HST technique similar to LST Bending. The key difference between the two is the method by which you bend the plants. Through LST Bending, you want to carefully manipulate the plant to avoid any damage while with Stem Mutilation our goal is to soften a portion of the stem enough to cause the growth above to wilt over without breaking the skin of the main stalk. For this technique, you’ll need soft foam ties, string, or any other type of tie you use to secure plants. First, locate a spot on the main stem that you want to mutilate. Then, using your thumb and index or middle finger, rub the stem until it becomes weak and flaccid. The stem should be weak enough to fall over by itself but not too weak that it tears. If you accidentally rip it, don’t worry, just used some duct tape to seal off the damage. Lastly, use your string or foam ties to support the bent stem. This technique combines the benefits of bending with a boost in growth in the plant. To repair the damage, your plant will flood the afflicted area with hormones, much of which is also used to grow secondary stems as well. If done correctly, a knuckle or callus should form where you mutilated the stem.
So there you have it growers, the 404 on the 101 of plant training. If you are new to this, start with the low-stress techniques and see what results you get. Once you can grow plants to completion and have some success with the low-stress techniques, you can start to try some of the high-stress techniques and see what happens. There are many ways to improve your garden through plant training, hopefully, one or more of these techniques will help you to get the most out of your plants!
____________________
Plant training tips of your own to share? Join the conversation, and comment below! Throw a picture on Instagram and tag us in it (@HTGSupply) – we’d love to see your results! Don’t forget to check out this week’s coupon code and sale information as well! From all of us here, good luck, stay safe, and Happy Growing!
FEATURED COUPON CODE: TRAINING20
Enter the promo code at checkout for a 20% discount on plant training supplies featured below or visit your local HTG Supply and simply mention this article to get the deal in-store! Thanks again for tuning into Talking Shop with HTG Supply! Offer valid through HTGSupply.com and in-store 07/27/18-08/31/18. Cannot be combined with other offers. Follow us on social media to learn more about indoor growing! Get all kinds of tips, tricks and techniques, and stay up to date all of our sales and events!