This article is part of a series written for HTGSupply by plant biologist Dr. E.R. Myers.
1. What is plant propagation
2. Types of cuttings
3. Cuttings overview
4. Cutting supplies
5. Preparation
6. General technique
7. Rooting Compounds
8. Rock wool Vs bio plugs and rooting agents
What is plant propagation
There are several methods of getting new plants or “propagating” plants. Sexual reproduction involves mixing the pollen from a male flower with the egg of a female flower. The pollen and egg can come from one plant (selfing) or two plants (outcrossing). Either way you are mixing DNA and will get long term storage of that “new” DNA in seeds or spores.

Sexual reproduction is the only way to get improved traits but also risks mixing good traits with inferior ones. (Look for future articles on plant breeding. I welcome questions about plant breeding at [email protected] this is one of my favorite topics since earning a Ph.D. in Plant Breeding and Genetics.)
The focus of this article is propagation via asexual reproduction such as taking cuttings of stems or leaves to create many genetically identical plants from the original (mother) plant. Another type of asexual reproduction is tissue culture, which involves growing cells from the mother plant in a nutrient agar medium. Although tissue culture kits are available to the home hobbyist, this article will concentrate on the simpler more popular methods of stem, root and leaf cutting propagation.
Asexual reproduction (sometimes called cloning) results in the offspring having the exact same genetic makeup as the original plant (mother plant). Asexual propagation is an invaluable tool used for many commercial greenhouse crops, allowing for consistent and predictable plants on a massive scale. Cloning allows growers of plants with separate male and female plants (dioecious) to grow only the number of plants needed because the clones will have the same sex as the mother plant. Clones from a genetically superior mother plant will all be just as genetically superior. An entire garden of cloned plants means all the plants will have the same growth habits, maturation time, nutrient requirements and even taste. Most plants have the ability to sprout roots when leaves or branches are cut and placed in a medium. Depending on the type of plant, each mother could produce tens, or even hundreds of identical offspring every couple of months.
Types of cuttings
One should use the type of cutting that has the most chance of success with the particular plant species they are propagating. Many nonflowering parts of a plant can be used. The most common methods are root cuttings, leaf cuttings and stem cuttings.
Root Cuttings

This is most successful with herbs and other plants that send up new growth from roots. A section of root is removed from the mother plant and buried just below the soil surface. Eventually the root produces new shoots. Bulbs can be propagated by removing small bulblets or offsets that form at the base of the parent bulb. These small bulbs take 2 or 3 years to mature into plants that flower. For plants with more widespread root systems you basically dig up a part of the root and plant it. Pick larger roots ½ cm- 1 cm (¼ to ½ inch) in diameter near the crown of the plant. Cut them into 5cm (two inch) sections cutting off slender branch roots. Place the root cutting in a moist medium and place more medium on top, just enough to cover the root. Then treat as any other cutting, keep warm and moist and under diffused light (fluorescent lights work well). The new growth can take a few weeks to come up.
Leaf Cuttings

Any plant with leaves such as the African violet, geranium etc. can be propagated with leaf cuttings. A leaf is removed and placed in moist soil. These have to develop both new stems and new roots. Some leaves will produce one plant at the base of the leaf. In some species, multiple new plants can be produced at many places on one leaf; this usually involves cutting the leaf veins in specific ways. You will have to try to see if it works for your plant. Using a sharp knife, cut off a healthy leaf at the point where it joins the stem. Insert the cut part, called a petiole, into the rooting hormone.
Place the end into a small container of light potting soil in which you make a small hole with a pencil. Treat as any other cutting; keep warm and moist place it under diffuse light (fluorescent light ).
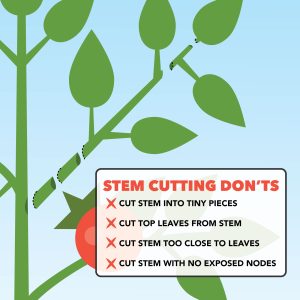
Stem cuttings
This is best for plants that have a branching habit with multiple leaves per branch. A stem with a couple leaves is cut and the lowest leaves are removed and the leaf scar / node where the leaf was cut from is placed below the soil line to promote root growth from the leaf scar. If you are only taking a few cuttings, just use the end of the branch. If you want more cuttings, you can cut a single stem into multiple sections, making sure each section has leaves remaining and an exposed leaf scar. Stem cuttings produce roots usually at the node. If you use rooting hormone, be sure to put the hormone at the leaf scar.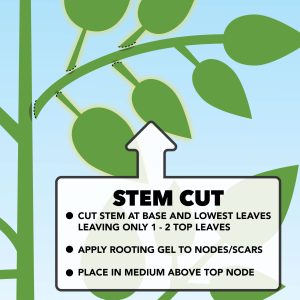
For stem cuttings each cutting should include a couple leaves and 2-4 inches of stem. The end of the stem works best, but you can get multiple plants from longer stems with multiple nodes. As you take your clippings, dip the cut end in a rooting compound to increase rooting before putting the cutting (cut end down) in soil or growth medium, insert the stem, so that the leaf scar is below the rooting medium and the lowest leaf is just above it. I have read that re-cutting the stem on an angle immediately before placing it into the rooting compound and medium will improve success. You should definitely re-cut the stem if there is a lot of time between taking the cutting and placing it in the growth medium. The idea is that the veins that transport water (xylem) will have air bubbles after being exposed by the cut, and won’t transport water. If you re-cut the stem the xylem above the original cut will still be filled with water and will be able to transport water from the medium into the new plant. When planting the cutting, making a hole prior to planting assures that the rooting hormone will not be brushed off the cutting when you plant it.
Cuttings overview
Taking a cutting is a simple process where a small amount of the parent plant is removed and is then encouraged to grow as an independent plant. However, the practice of taking cuttings is not as straightforward/easy as it may appear. Without providing the right growing conditions, it is more likely than not that the cutting will not “catch on” (form a new plant).
Before taking a cutting it is important to keep in mind the plants life cycle. Plants that are flowering tend to have less success with cutting. Cuttings can be taken pretty much anytime the plant is growing vegetatively. For the most part, once a plant has substantially entered the flowering part of its life cycle cuttings will be increasingly less successful as different hormones come into play. The problem is that often the fruit or flower is what we want to select for when we pick our next generation of plants so if you wait to see the flowers/fruits quality, it’s too late to take clones. You can always try to take cuttings later in the flowering cycle, plants don’t read books so sometimes things work when a book says it should not. Several compounds may be used to promote the formation of roots , many contain plant hormones (auxins). Among the commonly used hormone is indole-3-butyric acid, or IBA, used as a powder, solution or gel. This compound is applied either to the cut tip of the cutting or as a foliar spray.
Cutting supplies
Sterile/ sharp cutting tool
Moist growth medium
Hand sprayer
Dome / high humidity
Rooting agent
Root warmer (heat mat)
Fluorescent lights
Nursery Tray(s)
Preparation You should have a few things on hand before you take your first cutting. You need a good sharp cutting devise like a razor blade or scalpel. You can and should sterilize your cutting tools with alcohol, fire or bleach. Before you go hacking into the plant, you need to know that the quicker you turn the cut stem/leaf/root into a plantlet the better your success rate. In other words, as soon as you cut you should place the piece of plant in the medium and cutting environment. This means the growth medium has to be ready. I provide the cutting with a good growth medium such as rockwool, biodegradable starter pellets or soil that is light/airy. Perlite, vermiculite, and/or water-soaked sphagnum moss can be added to potting soil to make the soil light.
General Technique. Because the cuttings don’t have roots, water is going to be a limiting factor. Once you have planted the number of cuttings you want, cover them with a clear plastic dome (like a tall Humidity Dome ) to retain humidity and give the plants 18 hours of diffused light per day. With all types of cuttings you need to provide a humid environment which generally means placing the cuttings where the air can be kept humid/moist but still allow light to get to the plants. The light you use should be limited light, remember light drives photosynthesis which requires water. If you give the plants a lot of light, they will use up what water they have and dehydrate. Fluorescent lights are perhaps the best suited light source for cuttings. The light output promotes good growth, the light intensity is not excessive, and the low temperature does not put heat stress on the tender plantlets. Keep the light cycle on mostly light (18 hours on 6 hours off per day for example) and keep the fluorescent light several inches above the plants.
Keep the cuttings moist by generously and thoroughly using a fine mister (spray bottle). I use a inexpensive hand sprayer and there are many different styles for sale including rechargeable electric and pressurized sprayers available at HTGSupply.com. After taking the cutting, dipping it into rooting hormone and putting it in a moist medium, you should gently mist the plants until most of the leaf surface is covered with tiny water droplets. Then place a clear dome over the plants and put them under a fluorescent light. After a day the plant leaves should be dry. There is no need to mist if the leaves aren’t dry but if they are, please mist again. You also definitely need to get some more air flow over your cuttings before misting again. Your humidity dome should have some air vents that will need to be opened a little to provide some air flow. If you keep the cuttings’ environment too wet you are likely to get fungal growth, not plant growth. You could also mist the growth medium to keep it moist but not wet. Be gentle in your hand misting, you don’t want to stress the cuttings or worse knock them over with a blast of water. You should also place a heating mat underneath your cuttings. If you are using a Nursery Tray, the tall Humidity Dome is made so fit over top of the tray and heat mats are made to fit underneath the tray(s). To fine tune your cuttings medium temperature you may also get a Heat Mat Thermostat which adjusts the heat making the process more exact and possibly more successful. Having the roots warm and the above air temperature cool will greatly improve your success.
The two biggest threats to your cuttings, once they are established in the growth medium is stem rot and dehydration. Dehydration comes from improper irrigation i.e. forgetfulness. You must remember that cuttings are fragile little “babies” that need your daily attention. Please remember to keep an eye on them and make sure the grow medium is moist and your humidity levels in check. Stem rot is from a lack of oxygen around the plants. This can be prevented if you remove the cover for several minutes each day (up to an hour) to give the plants fresh air (oxygen). Even if you sterilize the area to prevent fungus and bacterial growth, if there is a lack of oxygen, carbon is also going to be limited which will give you a poor chance of plant survival (See Carbon and ventilation 9/08 ). Removing the dome for airflow is therefore bad for fungus and good for the plants so it should be done everyday for all types of cuttings. You should increase the time the dome is off the plants each day after the first few days. After a week to 2 weeks you should be able to remove the dome completely. If you notice the cuttings leaves “drooping” it is time to replace the humidity dome.
When the cuttings perk up and you see new growth you know the clippings have rooted, give the stems a very gentle tug. If the stem stays in the medium, success! Another method is to pick up the cutting by the medium (starter plugs ) to see if roots are growing out of the grow medium. The cuttings/clones should be transplanted soon after rooting. Transplant the new emerging plant into the area for vegetative growth. Continue to mist the plants to keep a humid environment for about 2 more weeks until active growth begins. As with anything you should start more cuttings than you need because it is likely that not all will make it and some will have stronger root masses than others. You will most likely improve in cutting success once you try it a few times.
Rockwool vs. bio plugs and rooting agents
This summer I conducted an unscientific exercise comparing various mediums and rooting agents. I did this to get an understanding of various products and to get pictures to help explain the process. I do not want to give the impression that what I am writing about is a valid scientific experiment, it is not. The following is an exercise in taking cuttings. My experience with cuttings is on a minor scale usually taking a few cutting from a “mother plant” in order to propagate plants that won’t flower or don’t breed true in the various greenhouses I have worked at.
I would welcome any ideas or comments from people that have other experiences with cuttings. As always you can E-mail me at [email protected] This summer I worked with stem cuttings. I dipped the cut stem into the rooting compound. I used a foliar spray with tap water to maintain humidity in the cutting container. As mentioned, a rooting hormone may be used to facilitate cuttings catching on, but generally is not the most important factor in the process. Temperature and humidity are two factors that are more critical to cutting success. Some people have found that using honey makes an effective rooting compound as well as any hormone. (Humboldt Nutrients Honey Hydro Carbs and Honey Organic ES also may help with cutting success ). In general, when starting a new plant from a leaf or stem cutting, the cutting will be more likely to form roots and create a new plant if a
rooting hormone is used and some plants cannot be cloned consistently without rooting
hormones.
Hormex vs. Rootech vs Humbolt Roots vs. Clonex
ROCKWOOL all these are promoted to enhance root growth so I did a very small test to compare them. Hormex, Humbolt Roots and Clonex (small sample came with HOT HOUSE tray I purchased) are in liquid form. Rootech is a gel and a gel should stick to the stem better than a liquid or a powder. Humbolt Roots suggested that the compound be used when watering the plants. I did NOT follow directions and used Humbolt Roots as I did the other rooting agents, I simply immersed the cuttings in the liquid for a few moments before planting. I took three cuttings of lavender and hops with each product and used rockwool as the medium for all of them. All were placed in the same container with same environmental conditions. Hormex success was 2/3 lavender 1/3 hops, Clonex 1/3
lavender 0/3 hops, Humboldt roots 2/3 hops/ 3/3 lavander* and Rootech 1/3 lavander 0/3 hops. * The roots for Humboldt Roots were not well developed at two weeks, but did eventually develop, all other rooting agents at two weeks either had significant root growth i.e. could be transplanted or had no root growth.
Hormex vs. Rootech vs Humbolt Roots vs. Clonex Boidegradable Pellets
I took three cuttings of lavender and hops with each product and used biodegradable pellets as the medium. Rootexh 2/3 hops 1/3 lavender, Humboldt roots 0/3 lavander 2/3 hops, clonex 0/3 lavender 2/3 hops, hormex 2/3 hops 0/3 lavander.
I think the big difference here was not in the rooting agents but in the medium. The biodegradable pellets held much more water than the rockwool. Consequently, I realize it is a bad idea to use both mediums in one tray, the rockwool will either be too dry, or the pellets too wet. The lavender did not like the biodegradable pellets or it would be more accurate to say lavender did not like how wet I had to keep the pellets so that the rockwool would not dry out.
Lesson learned! For the remaining experiments I only used one type of medium in each tray. Hormex vs. Rootech These products both have plant hormones so I compared these two on more cuttings. I had one tray filled with 24 coconut husk pots with a potting soil mix, I put two cuttings in each pot. For the Hormex lavender cuttings 17/18 were successfully transplanted and the Rootex was 14/20 transplanted (nontransplanted = no new plant from cutting).
I only had limited space this summer but I did some other tests. I took six cuttings of spearmint and put them in rockwool using Hormex and Rootech. Both products were 3/3 but the Hormex had significant root growth after one week, the Rootech had minimal growth. I then did another comparison using lavender in rockwool both hormex and rootech were 8/8 but Hormex had 2
times the leaf and root mass as Rootech after two weeks. With this small sample, I would say Hormex is by far the better product, and is cheaper too.
Rockwool Vs Bio plugs wrap-up Ease of use, Rockwool A+ok and Bioplugs (compressed coco plugs that come with the HOT HOUSE ). Both could be used successfully for taking cuttings.
Both should be presoaked before you pick up the scissors to take a cutting. The bioplugs can be crumbly and messy and really stay saturated with water. Rockwool is neat, easy to use and had
good drainage of water.
I should note that the biodegradable plugs were soaked in plain water until they swelled, about ½ hour. Then plugs and dry rockwool were soaked overnight in diluted fertilizer (2ml/gallon Humboldt Grow 3-1-3 and 2ml/ gal Humboldt bloom 0-10-0.) I assumed this mix gives cuttings all essential nutrients, with the highest nutrient being phosphorus to promote root growth. Many people have suggested not giving cuttings any fertilizer. I used a very diluted fertilizer in this exercise. I hope this information helps and inspires you to try taking your own cuttings and to run your own experiments so that you can improve how you grow your favorite plants.
Good Growing,
Dr. E.R.Myers